
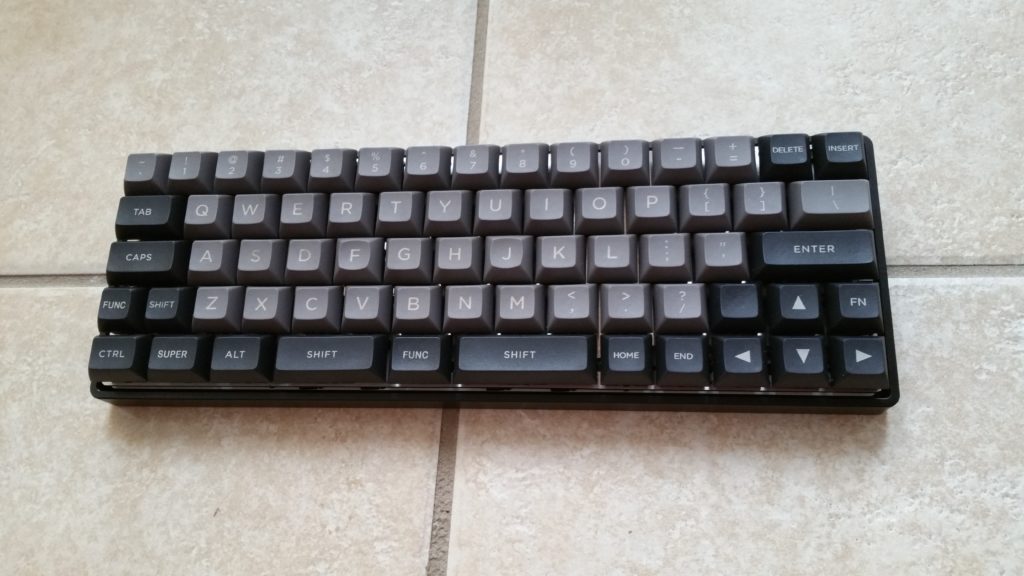
This is my 60% keyboard built on the DZ60 Rev 2.0 printed circuit board.
These are the steps I took to configure it for my use. Please note that I had configured this keyboard using Linux; Windows and Mac alternatives exist, but they are outside the scope of this article.
1. The DZ60 can be customized using Quantum Mechanical Keyboard Firmware. I downloaded a copy of it here: https://github.com/qmk/qmk_firmware/zipball/master.
2. I then unzipped the files to ~/software/qmk/
3. Run this shell script to ensure all dependencies are installed:
sudo ~/software/qmk/util/install_dependencies.sh
4. Create a folder that will hold my custom keymapping file: ~/software/qmk/keyboards/dz60/keymaps/cpc1/keymap.c
I am utilizing 4 layers. Generally speaking:
Layer 0 is the main layer containing QWERTY and other such keys that I will use most often.
Layer 1 is activated by holding the key located beneath B. This layer contains F1-F12, basic navigation (ESDF for cursor movement, page up/down), volume control, and number pad (at right hand home row region).
Layer 2 is activated by holding the key located beneath NM.. This layer contains mouse navigation keys (ESDF for mouse movement, XCV as the three mouse buttons).
Layer 3 is activated by holding the key located beneath ENTER and to the right of UP. This layer contains keyboard hardware control keys (reset, LED controls).
This is my full keymap.c file:
#include "dz60.h"
#define __      KC_TRNS
#define ___     KC_TRNS
#define _______ KC_TRNS
#define HY      KC_HYPR
#define LST     KC_LSFT
#define SP_MO1  LT(1, KC_SPC)
#define BS_MO2  LT(2, KC_BSPC)
#define PN_MO3  LT(3, KC_PSCR)
const uint16_t PROGMEM keymaps[][MATRIX_ROWS][MATRIX_COLS] = {

	// Layer 0 - Standard keyboard
	KEYMAP_2_SHIFTS(
		KC_GESC, KC_1   , KC_2   , KC_3   , KC_4   , KC_5   , KC_6   , KC_7   , KC_8   , KC_9   , KC_0   , KC_MINS, KC_EQL , KC_DEL , KC_INS,
		KC_TAB , KC_Q   , KC_W   , KC_E   , KC_R   , KC_T   , KC_Y   , KC_U   , KC_I   , KC_O   , KC_P   , KC_LBRC, KC_RBRC, KC_BSLS,
		KC_ESC , KC_A   , KC_S   , KC_D   , KC_F   , KC_G   , KC_H   , KC_J   , KC_K   , KC_L   , KC_SCLN, KC_QUOT, KC_ENT ,
		HY, LST, KC_Z   , KC_X   , KC_C   , KC_V   , KC_B   , KC_N   , KC_M   , KC_COMM, KC_DOT , KC_SLSH, KC_RSFT, KC_UP  , PN_MO3 ,
		KC_LCTL, KC_LGUI, KC_LALT, KC_SPC , SP_MO1 , BS_MO2 , KC_HOME, KC_END , KC_LEFT, KC_DOWN, KC_RGHT),

	// Layer 1 - Cursor Navigation, Volume, Number Pad
	KEYMAP_2_SHIFTS(
		_______, KC_F1  , KC_F2  , KC_F3  , KC_F4  , KC_F5  , KC_F6  , KC_F7  , KC_F8  , KC_F9  , KC_F10 , KC_F11 , KC_F12 , _______, _______,
		KC_TAB , KC_HOME, KC_PGUP, KC_UP  , KC_PGDN, _______, _______, KC_7   , KC_8   , KC_9   , KC_PPLS, KC_PMNS, _______, _______,
		_______, KC_END , KC_LEFT, KC_DOWN, KC_RGHT, _______, _______, KC_4   , KC_5   , KC_6   , KC_PAST, KC_PSLS, KC_PENT,
		HY, LST, KC_MUTE, KC_VOLD, KC_VOLU, _______, _______, _______, KC_1   , KC_2   , KC_3   , _______, _______, _______, _______,
		KC_LCTL, KC_LGUI, KC_LALT, _______, _______, KC_0   , KC_PDOT, _______, _______, _______, _______),

	// Layer 2 - Mouse Navigation
	KEYMAP_2_SHIFTS(
		_______, _______, KC_ACL0, KC_ACL1, KC_ACL2, _______, _______, _______, _______, _______, _______, _______, _______, _______, _______,
		KC_TAB , _______, _______, KC_MS_U, _______, _______, _______, _______, _______, _______, _______, _______, _______, _______,
		_______, _______, KC_MS_L, KC_MS_D, KC_MS_R, _______, _______, _______, _______, _______, _______, _______, _______,
		HY, LST, _______, KC_BTN1, KC_BTN3, KC_BTN2, _______, _______, _______, _______, _______, _______, _______, _______, _______,
		KC_LCTL, KC_LGUI, KC_LALT, _______, _______, _______, _______, _______, _______, _______, _______),


	// Layer 3 - Keyboard Hardware Controls
	KEYMAP_2_SHIFTS(
		RESET  , _______, _______, _______, _______, _______, _______, _______, _______, _______, _______, _______, _______, _______, _______,
		_______, _______, _______, _______, _______, _______, _______, _______, _______, _______, _______, _______, _______, _______,
		_______, RGB_TOG, RGB_MOD, RGB_HUI, RGB_HUD, RGB_SAI, RGB_SAD, RGB_VAI, RGB_VAD, _______, _______, _______, _______,
		__, ___, BL_TOGG, BL_DEC , BL_INC , _______, _______, _______, _______, _______, _______, _______, _______, _______, _______,
		_______, _______, _______, _______, _______, _______, _______, _______, _______, _______, _______),
};
5. Open a terminal window and navigate to ~/software/qmk/
6a. Run this command if you just want to create a hex file without actually flashing the keyboard:
sudo make dz60:cpc1
6b. Or, hold spacebar and B on the keyboard while plugging it into your computer; this will start the keyboard in bootloader mode. Now I can run the following command to compile the hex and then flash it onto the keyboard:
sudo make dz60:cpc1:dfu
6c. Or, if the keyboard is already plugged in and in use, run this command (same as 5b above). When the hex is built, it will prompt you to reset the keyboard so that the hex can be flashed onto the keyboard. In my case, my reset button is in Layer 3, as noted earlier.
sudo make dz60:cpc1:dfu
Additional info:
Full Documentation: https://docs.qmk.fm
GitHub of QMK Project: https://github.com/qmk/qmk_firmware/
Great! This is just what I needed in search of next mech. keyboard.
I want 60% with arrows and some more keys (End,Home,PgUp,PgDown)
I also like the fact that you’re not using full space bar but instead have room for more modifier keys. What does the 1u “Func” key left of the 1u shift key do?
This is just what I needed to make a decision. Been looking at GK64, KBD75, TADA68…but I think I found what I needed.
Dino,
This may not matter much, but I have since changed the keys around a little bit. My bottom row now looks like this, from left to right:
The Func key engages a layer mainly with ESC (for print screen) and nearly the entire top row (F1 through F12).
On the second row, the far left key currently engages, when held, a layer that changes IJKL into mouse movement keys while Space, Super, and Backspace serve as Left Click, Middle Click, and Right Click, respectively. I still debate with myself on whether it was a smart decision to split Left Shift or not, though I do generally like the fact that this gives me an additional Func/Modifier.
On the right side of the second row, the three buttons there are, when tapped:
The same three buttons are, when held:
The Func in this case engages yet another layer. I do not think this layer has changed since I wrote this post.
When I was choosing a board, QMK was an important factor. I want to be able to work on the keyboard’s configuration on my own computer without relying on any websites or Flash tools.
For your extra layers, are you required hold down a function key to use to them or do any of them toggle?
How is your Escape key handled? I don’t see it in the photo, but in your keymapping code, it appears to be mapped to the upper left where the tilde key is.
I’m also considering a DZ60 build with a split keyboard. Your write-up was helpful
Thanks for visiting Dev-Notes Mark.
For layers, I’m using LT(), so yes, holding down a key is required. Toggle is an available option, if you don’t already know — It is TG().
As for escape key, I’m using the Grave Escape feature (keycode KC_GESC). When tapped, the key sends “escape” signal; if I hold the shift key and then tap, it will send the “~” signal.
Hope this helps!